EZ4U2 Headlight Restoration Kit Produces Professional Results Everytime
|
|
|
|
|
|
|
|
|
|
|
|
|
|
|
|
|
|
|
|
|
|
|
|
|
|
|
|
|
|
|
|
|
|
|
|
|
|
|
|
|
|
Headlight Restoration Service
Search by Keyword
Headlight Restoration Kit
Instructional Video
4-Steps DIY Headlight Restoration Kit Only $19.95
Using The EZ4U2 Headlight Restoration System
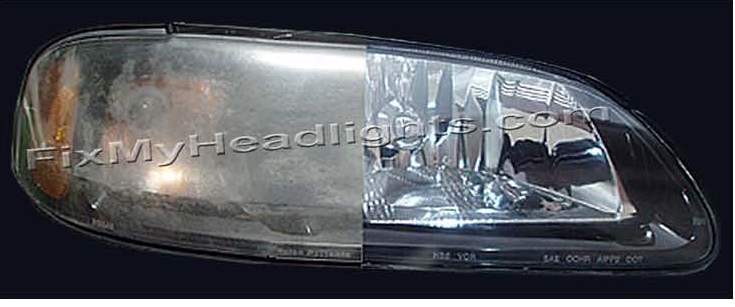
This Is How You Restore A BMW Foggy Headlights
The instructions below will work on BMW X5, X3, BMW 325i, 330 Bmw 525, 530, 545, BMW 7 series 745 and 760, BMW M3 and BMW Z4 and more....
Restoring a BMW foggy headlights are not much different from a Toyota or a Nissan. The principle of headlight restoration remains the same throughout. There are four basic steps
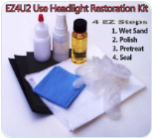
- Sand the foggy headlights from coarse to fine
- Polish the now clean headlights
- Clean the headlights with a pre-treater
- Seal the clean headlights
On an average Japanese car you can start sanding with a #400 grit sandpaper or possibly a 1000 grit and then move on to a 2000 grit sandpaper. However the German car headlights like BMW I recommend starting with #220grit sandpaper especially if the headlights are not completely oxidized looking either yellow or whitish.
If your headlights are foggy or cloudy in some areas and it is crystal clear on the other areas that means you have some existing manufacturers sealant left on the headlights. Believe it or not headlights in this condition are a little more difficult to restore than a headlight that is completely oxidized. The sealant on the BMW headlights are extremely tuff and using #400grit sometimes skids off the sealant with very little effect. For that reason I recommend starting with #220 grit sandpaper when you are restoring partially foggy headlights or headlights that are just starting to get foggy or cloudy on BMW cars
Note
Most vehicle headlights can be restored and it does not matter the make and model of car. We have use this headlight restoration kit on Mercedes, BMWs, Hyundais, Hondas, Jaguars, Nissan, Fords, Toyotas, Mazdas, Maserati, Porches, Farraris, Kias and more.......
This EZ4U2 Headlight restoration kit work really good. Just follow the written instruction in the kit and the instructions and tips on the video and you will be supprized at your results. I guarantee it!!
So just click on the order now button and start seeing the light!

EZ4U2 Headlight Restoration Kit 4 Simple Steps To Restore Your Foggy Headlights
|
#400 / #1000 / #2000 wet sand paper enclosed in our headlight restoration kit. |
|
|
Use the headlight polish #2 and a white towel in our headlight restoration kit. |
|
|
This step removes any residual polish or grease that is on the headlight lenses. Also it prepares the lens to receive the sealant to form a strong bond. |
|
|
|
Now that your headlights are clean we can proceed to sealing them so they last a long time.
Note: Overlap passes by 50% this will allow you to maximize your sealant coverage. |
 |

customerservice@fixmyheadlights.com